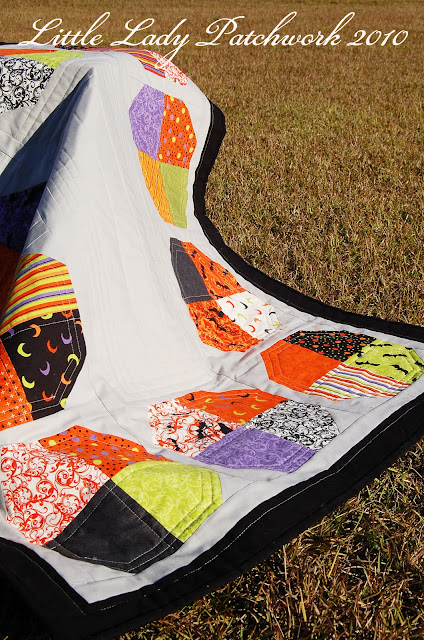
This is a charm pack friendly tutorial. For the fabric requirements and cutting instructions, check out Part 1 of this tutorial here.
In Part 2 of this tutorial, we will be quickly constructing and assembling the quick top. So grab your cut fabrics and let's start "spooking"!
Block Construction
Note: All seams are a 1/4". Press all seams to one side.
Step 1:
- Gather your Moda Bella Solid Stone 2 7/8" X 2 7/8" squares
- Lay your ruler from corner to corner on the 2 7/8" X 2 7/8 squares.
Step 2 :
- Draw a diagonal line from corner to corner on each of the 2 7/8" X 2 7/8" squares.
Step 3:
With Rigth Sides Together (RST), layer a 2 7/8" X 2 7/8" square on top of a 5" X 5" charm square.
Step 4:
- Using your sewing machine, stitch on the diagonal line.
Step 5:
- Place the 1/4" mark of your ruler on the diagonal line that you just stitched.
Step 6:
Using you rotary cutter, trim 1/4" away from the diagonal line.
- Press the block open.
- The block should measure 5" X 5".
- Repeat and make a total of (40) 5" X 5" blocks.
Step 8:
- Layout the charm squares as shown below.
Step 9:
- With RST, layer a 5" X 5" charm square on top of another 5" X5" charm square.
- Stitch the blocks together.
- Press the block open.
- The block should measure 5" X 9 1/2".
- Repeat and make a total of (20) 5" x 9 1/2" blocks.
Step 10:
- Layout the blocks as shown.
- With RST, layer a 5" X 9 1/2" rectangle on top of another 5" X 9 1/2" rectangle.
- Stitch the blocks together.
- Press the block open.
- Block should measure 9 1/2" X 9 1/2"
- Repeat and make a total of (10) 9 1/2" X 9 1/2" blocks.
- Finished block size : 9 " X 9"
Step 11:
- You are now ready to assemble your blocks. Refer to the photos and diagrams for your block placement.
- Layout the blocks into 3 rows.
- Row 1 & Row 3 will each contain (4) 9 1/2" X 9 1/2" blocks. Place a 1 1/2" X 9 1/2" rectangle between each block.
- Row 2 will contain (2) 9 1/2" X 9 1/2" blocks. Place the 9 1/2" X 21 1/2" rectangle between the two blocks.
Step 12:
- Make a quilt sandwhich and baste the layers together.
- Quilt as desired.
- Bind the quilt using your favorite method.
SPOOKTACULAR NIGHT
44 " X 34"
Finished Block Size: 9" X 9"
I hope that you are inspired to create your own SPOOKTACULAR version of my quilt!
Until Next Time...Happy Quilitng!


.jpg)
.jpg)
.jpg)
.jpg)
.jpg)
.jpg)
.jpg)
.jpg)
.jpg)
.jpg)
.jpg)
.jpg)
.jpg)
.jpg)
.jpg)
.jpg)
.jpg)
.jpg)
.jpg)
.jpg)
.jpg)
.jpg)
.jpg)
.jpg)
.jpg)


Thanks for a lovely pattern which will do for all seasonal festivities!
ReplyDeleteThat's gorgeous, thank you for the tutorial! I love seasonal projects!
ReplyDeleteLove this! What a great quilt seaseonal quilt!
ReplyDeleteWhat a great tutorial...makes a very eye catching quilt.
ReplyDeleteGreat tut girl. Love it! Hugs Nat
ReplyDeleteGreat tutorial! I like how the center is blank or empty, adds a unique twist to a patchwork quilt.
ReplyDelete