Today is my turn to post my block
for the BLOGGER'S BLOCK OF THE MONTH
hosted by Dhia of The Peach Patch.
My scrap bin is OVERFLOWING so I thought that I would take this opportunity
to create a block that puts all of those scraps to good use.
STACKS & STACKS QUILT BLOCK
Finished Block Size: 9 1/2" X 9 1/2" Square
This block is a great way to use up your fabric scraps, so dig into your scrap bin and enjoy!
Fabric Requirements
- Various scraps from your scrap bin
- Two 3 1/2" X 3 1/2" white background squares
- Two 3 7/8" X 3 7/8" squares from your scrap bin
Block Assembly
Note: All seams are sewn with 1/4" seam allowance.
Step 1:
- Dump out your scraps and choose your favorites.
- Cut your scraps into various widths and lengths. Do not worry about cutting your scraps to an exact width. All of my strips vary in width from 1" to 2 1/2". I did cut my strips to a length of at least 5-6".
Step 2:
- Decide on the placement of your strips.
Step 3:
- Place the your first two fabric strips Right Sides Together (RST).
- Pin.
- Sew the strips together.
Step 4:
- Press the block open.
Step 5:
- With RST, pin the next fabric strip to the block.
- Sew the fabric strips together.
- Press the block open.
Step 6:
Step 7:
- Continue sewing the strips together until your block is at least 11".
Step 8:
- Using your ruler and rotary cutter, square up the first side of the block.
Step 9:
- Continue to square up the block so that it measures 3 1/2" X 9 1/2".
- Repeat Steps 3-8 until you have two 3 1/2" X 9 1/2" stack blocks.
Step 10: Half Square Triangle (HST)
- On the back of a 3 7/8" X 3 7/8" square, use your pencil and ruler to draw a diagonal line from corner to corner.
Step 11:
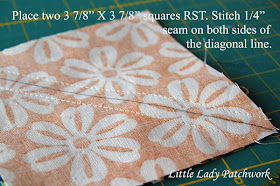
- Place two 3 7/8" X 3 7/8" squares RST.
- Stitch a seam 1/4" away from the diagonal line. Repeat for the other side.
Step 12:
Step 13:
- Press the bock open.
- Trim the block to 3 1/2" X 3 1/2".
- Yields two 3 1/2" X 3 1/2" HST
Step 14:
- With RST, sew a 3 1/2" X 3 1/2" white background square to a 3 1/2" X 3 1/2" HST.
Step 15:
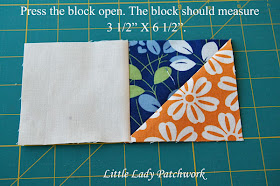
- Press the block open.
- The block should measure 3 1/2" X 6 1/2".
Step 16:
Step 20:
- With RST, sew the last stacked block to the HST block.
Step 21:
- Press the block open.
- Voila! Enjoy your Stacks & Stacks Quilt Block
- Finished block : 9 1/2" X 9 1/2"
Be sure to check out the Flickr group for the Blogger's Block of the Month and add your block!
Stop by Dhia's blog on the 15th of each month to find the link to the next
Blogger's Block of the Month.
Until Next Time...Happy Quilting


.jpg)


You posted editorial BLOGGER'S BLOCK OF THE MONTH {STACKS & STACKS QUILT BLOCK}which gives users bunch of information concerning meticulous subject recognition for this allocate.
ReplyDeletedissertation uk
Thank you for this, I've just spent 3 days cutting fabric into strips, triangles sq's etc for future projects as you can imagine I ended up with quite a large box full of scraps. Now this idea is great and very useful to have, now I can make a quilt from my scraps wasting nothing. Again thank you.
ReplyDeletePeg xx
I like this very much. Thank you!
ReplyDeleteTHIS IS AN AWESOME CRAFT AND TUTORIAL WILL BE SO HELPFUL WHEN SEWING IT. I HAVE ADDED IT TO MY FAVORITES AND AM EXCITED TO MAKE 1 OR SEVERAL. THANK YOU FOR SHARING
ReplyDeleteBernysblessings.blogspot.com
Very nice tutorial. I am new to quilting so I need to ask for the reason for the white squares. All the beautiful material and two white squares? This is not a criticism . Your are not the first quilter I have seen do this. Is it a personal preference or a visual thing. Thank you for your time in making the tutorial and all the pictures.
ReplyDeleteThe reason for the white is that it gives your eyes a place to rest from all those prints. If we could see a completed quilt, this would make sense.
DeleteGreat tutorial but would have loved to see this quilt in completion.
ReplyDeleteis there a quilt using this block? having trouble visualizing it. even a few blocks together would be helpful thanks.
ReplyDeleteI would love to see a finished quilt made of these blocks. Do you have one completed?
ReplyDeleteDo you have a quilt made of this? I'd love to see a finished one because I'm not sure of the overall look?
ReplyDeleteHelloooooo from California. I have just become addicted to the wonderful world of quilting and love your site!! This block is fun and I totally need it for my scraps!!! Great stuff and perfect (not to measure every single piece in the beginning is fun too... :D Thanks again and hope to see each other in the quilting world again!!
ReplyDeleteGreat idea and I love that I will get to use some of my favorite scraps somewhere!!! Cute, cute, cute!
ReplyDeleteI just had another thought. This would be an easy project to use paper piecing for your strips.
ReplyDeletelove this idea! and a reason to save my scraps! looks like the ideal thing for my Therapy box too! Thank you!
ReplyDeleteA full quilt would have been helpful. It's easier to understand how to set the blocks up with a picture of a quilt
ReplyDeleteCould you please show a pic of the finished quilt using this block. Several others have also requested a pic. Want to start this but need to see the whole picture!
Deletevery nice. I have lots of children's fabric scraps and can make another give-away blanket for charity.
ReplyDeleteLove this block! For those wishing to see a full quilt, to get an idea if how it could look — get some graph paper & colored pencils. If you can find graph paper with 1/4 inch squares, it’ll be easier.
ReplyDeleteNow using lots of different colors, draw & then color in this block. Remember to take off the outside seam allowances when drawing it, I usually use one graph block to be one inch of drawing a block.
Now play! Do a drawing where the white blocks touch the white squares of the blocks just above & just below — meaning too that the colored stripe panels will be sitting next to the color strips of the block next to them.
Then Play! Draw turning every other block so that the white squares are touching the color-stripe SIDE of the blocks next to them, not ever touching another white square.
Etc. This is how we’ve planned our quilts for centuries, drawing/coloring and Playing.
Including too, making up four or more blocks and moving them around in front of you to see what arrangement YOU like best.
Have fun....
It is easier to cut if you cut 4"inch squares instead of 3 7/8" squares for the triangles since a 7/8" marking is hard to find. Then after you sew and cut the squares, you can square them up to 3 2/2".
ReplyDeleteSeveral people have asked to see a picture of this quilt finished...I would also like to see this finished as it's hard to visualize...many thanks
ReplyDeleteDid anyone ever make this? Would still love to see the entire quilt.
ReplyDeleteI love this quilt pattern and have made 3 quilts for my sisters-in-law. I sashed the quilt blocks with a 1 1/2 inch strip using a bright color for the sashing and the border. I really like the way it looked when finished.
ReplyDeleteJust made this pattern last weekend. Love the way it came out!👌
ReplyDeleteCan anyone put up a picture of a finished quilt?
ReplyDeleteHi, I love your patterns. I use them for making quilts for cancer patients. Is there a way to print the patterns?
ReplyDeleteThank you for the timeless and very useful idea. Great way to use the scraps I've accumulated over the years.
ReplyDeleteGreat timeless tutorial. Thanks for the clear pictures so there is no misunderstanding as to how accomplish this block.
ReplyDelete